Monday, July 15, 2013

Washi Dress; V 3.0


This past weekend my aunts got married. It was so much fun and I think everyone there cried and had a blast. My mom told me a few months ago that she would buy me a dress to wear to the wedding. Then when we were at Alewives Fabric I mentioned making my dress so she bought me the fabric and I got to work. It's the Washi pattern that I have used before. I changed the neckline, and lined most of it. I didn't have enough fabric to line the whole thing, bummer, but the entire top is lined. To do the lining I used all of Rae's videos posted here. The videos are very helpful. My one fail was trying to do a French Seam, big mistake. I should practice more (a lot more) on scrap fabric before trying it again on a garment.

Charlie was a good sport and measured the hem for me. Good thing he doesn't read my blog, he'd be embarrassed I told you that. The dress is made out of viole (pronounced vwall; I just learned that), by Anna Maria Horner, it's so unbelievably soft. The temperature was pretty hot at the wedding but I was cool in the dress, until I started dancing at least. The best part was people didn't know I had made the dress and kept asking me where I got it. Biggest compliment a seamstress can get is asking where their homemade clothes were purchased.

We all had a fabulous time.

Lauren

Thursday, July 11, 2013

Updates

I felt bad that my blog header did not have Blaze in it. He was getting a little peeved about it too. So I fixed that by spending 20 minutes making a new one. See above! It's a picture from a hike we took the other day.

Blaze was also sad that he didn't make an appearance on the "About Me" page so I updated that too and added the cutest picture of him. Now Blaze feels like a true member of the family. A tag with his name and our address/phone number just wasn't enough.

And, just because here is another cute cute cute picture of Blaze.


Lauren

Wednesday, July 10, 2013

Summer Drink

Hi Friends! It's pouring rain here and about 67 degrees, so it seems strange to post about my new favorite summer drink, but oh well. I can't scrape or paint the house so here it comes. You will need:


When I say "real" Maple Syrup I mean only from New Hampshire maple syrup, none of that junk from Vermont. Some people will find this hilarious I am sure because I don't even eat this maple syrup on my pancakes, I use the fake stuff. If you don't have a Soda Stream to make sparkling water, well 1. You should get one, it's the best thing ever, and 2. I feel bad for you, and 3. You can just use club soda or sparkling water from a can I suppose. We used Newman's lemonade, but have been using the Tropicana lemonade; which I like better than Newman's; sorry Paul. Once you have assembled your ingredients proceed to step one.
1. I have no idea how much this actually is, maybe a cup or lemonade.
2. Add sparkling water to almost fill the cup.
 3. Add a bit of maple syrup to taste; perhaps a tablespoon (but don't trust me, I can't cook)
4. Stir your concoction; taste, add more maple syrup to make it sweeter. If you wanted to you could even add some real lemon for garnish/added flavor. I used all of our lemon trying to lighten my hair.

5. This is a pretty obvious step. I should have added, use hashtag #summerdrinkcourtesyoflauren when posting pictures to Instagram.

Let's hope the rain stops soon so I can continue painting the house, sit in the sun and read my book and lighten my hair.

Lauren

Friday, July 5, 2013

Summer Tank

Two weeks ago sewed a summer tank top for myself. See I told you I was sewing. Then the weather was too cold to wear it, and then I wore the shirt, and shorts for three days in a row waiting for Charlie to take my picture. And then the stars aligned, the sun came out, and Charlie agreed to take my picture. 

The pattern is Simplicity 1693. Very simple. Surprisingly I did not change anything about the pattern. I had tried to make this shirt over the winter with some sale fabric and it was a disaster which ended up in shreds, then in the trash. (Whenever a project doesn't work out I MUST tear it to pieces to make myself feel better. Learned that move from my Mom. Anyone else do that?) Anyways, I was leery of the pattern, but it turns out my fabric choice this winter was to blame, not the pattern. 

As with most of my sewed clothing, it is a tiny purple flower print. Learned that preference from my Mom as well. I like the elastic around the waist, and the keyhole in the back. I did not sew a button hole for this, it only asks you to make a loop out of thread. Easy enough. Even easier still is that I can take the top on and off without even unbuttoning it.

Sometimes I realize how egocentric blogging is. Here look at some more pictures of ME! Here's one of me with my plants. I haven't killed them yet, nor has all the rain. 

Lastly, in case you need some Lauren Cheese-Factor. Here you go. 

Luckily I can now change my outfit. 

Lauren 

Wednesday, July 3, 2013

Pattern Organization

When I was shopping with my Mom at Alewives I pulled out my little pattern book to reference. She commented on it and said what a good idea it was so I figured I'd share the idea here too in hopes that it could help someone out.

I find that when I used to go to fabric stores I would either find patterns on sale that I liked and buy them, or I find fabric that I liked and buy it. The two things don't usually happen at the same time. This resulted in me having patterns I never used, and fabric that I bought 1-2 yards of because I thought it was pretty, and never used. Not anymore. At the beginning of the year I vowed to not buy fabric unless I had a clear plan and pattern to use it for. (I've only made one slip up thus far). To remedy this I made a cheat sheet of my patterns.

In Goggle Docs I created a table 2X2 size and wrote the pattern name at the top, both designer and pattern number. Then in the table I added either a picture that I liked of the pattern, most found on pinterest, or a copy of the sketch from the back of the pattern. The sketches are easy to find if you just google image search the pattern number. Then I used my measurements to figure out how many yards of fabric I would need for each pattern, wrote that into the document, wrote the notions I would need, and the recommended types of fabric for each pattern. I printed the document and pasted each pattern write up in a little book that I carry in my purse. Speaking of purses, I also have a few write ups about the purse patterns I have, just in case I find some awesome fabric I want to use to make a Bonsai Bag, even though I wasn't planning on making one (true story, this actually happened to me.)

I did all this before I got a smart phone, which makes looking up your patterns a lot easier, but you still have to remember what patterns you have at home. I've also e-mailed my smart/tech-savvy friend about creating an app like this little book, but I think he said there is already something like that, or he thinks I am crazy so he ignored me. I'm not sure, both are very real possibilities.

This system works well for me. I have added the two links to my google docs of all the patterns so you can get a better look and copy/modify the documents as you see fit, if you'd like.

Do you like how I write this posts like 10,000 people who sew read this blog, when really most of my readers are my family and friends who don't sew at all, some of whom I force to read my blog (Hi Charlie!) My little book also contains random musing on life, grocery lists from 2007, a King of spades I found on the ground in Charleston, and this sketch of my dorm room layout circa 2005. Good times.

I hope this helps at least one person in blogland.

Lauren!

P.S. Happy Anniversary Dad and Marylou!

P.P.S. Happy Almost 4th of July, and Engage-aversary to Charlie and I.

Tuesday, July 2, 2013

Kitchen Painting

Charlie and I decided that since it's been so hot and humid it was the perfect time to do two things: 1. Buy a pellet stove, and 2. Paint the kitchen. 

You might remember that there was an outdated fruit basket border around the kitchen, and a maroon/red paint on the walls. I didn't like it instantly when we looked at the house, and was sure it would be the first thing to go when we moved in. I did purposely rip the border while cleaning the walls 2 days after we moved in (so no one would like I actually liked it), but aside from that we lived with it for the last two months. Mostly because I wasn't sure what color to paint it.  

On Sunday I had had enough of the border and immediately following breakfast I began to tear it down. It wasn't until 2 that I realized I hadn't brushed my teeth. It was tough work. I wished we were either shorter, or had longer arms. We had to stand on the counter to reach the boarder, but that involved bending your neck. We tried to use a step ladder, but then our arms weren't long enough to reach over the cabinet. Also, the recessed lighting kept burning my face and hair. It took us four hours just to get the border off. After that Charlie cleaned and entertained the dogs and I got painting. I think he was sick of being in the kitchen with me, and listening to my 90's music choices.  

I did two coats on the bottom and one coat on the top on Sunday, then we went to a friends for dinner, thank goodness because the kitchen was a wreck and we wouldn't have been able to make much of anything in there. Then on Monday morning I did another coat above the cabinets. It didn't take too long, because there wasn't really much wall space. I used less than a quart of paint. So glad I didn't let the guy at Home Depot talk me into buying a gallon.


Some parts were a real pain to paint though. Like this little area between the cabinet and door to the garage. Luckily I had a tiny art paintbrush that did the trick.

I told you it was a disaster in there. After letting everything dry we out everything back, mostly in the same spot. We realized how much cabinet space we have that we weren't using so some things that were on the counter and now in cabinets. Here is the before and after. 

Much more my style. I like it a lot. I can't tell if Charlie has a style/likes it or if he just likes it because I like it. Some more after shots, goodbye fruit basket border. 


Now that the border is gone I can focus on the other (smaller) things I want to change in the kitchen. First up is the cabinet doors below the sink. I am not sure why the previous owners painted them green, but they did. My dad says there is no way we can stain them again so I guess we'll have to paint them as well. Any ideas on colors? I was thinking about stenciling them but I think that would make it look like a 95 year old woman lived here, and my sewing room already gives that impression, we don't need more of that. I also thought about taking the doors off and having a little fabric curtain there, Charlie said no to that idea though. 

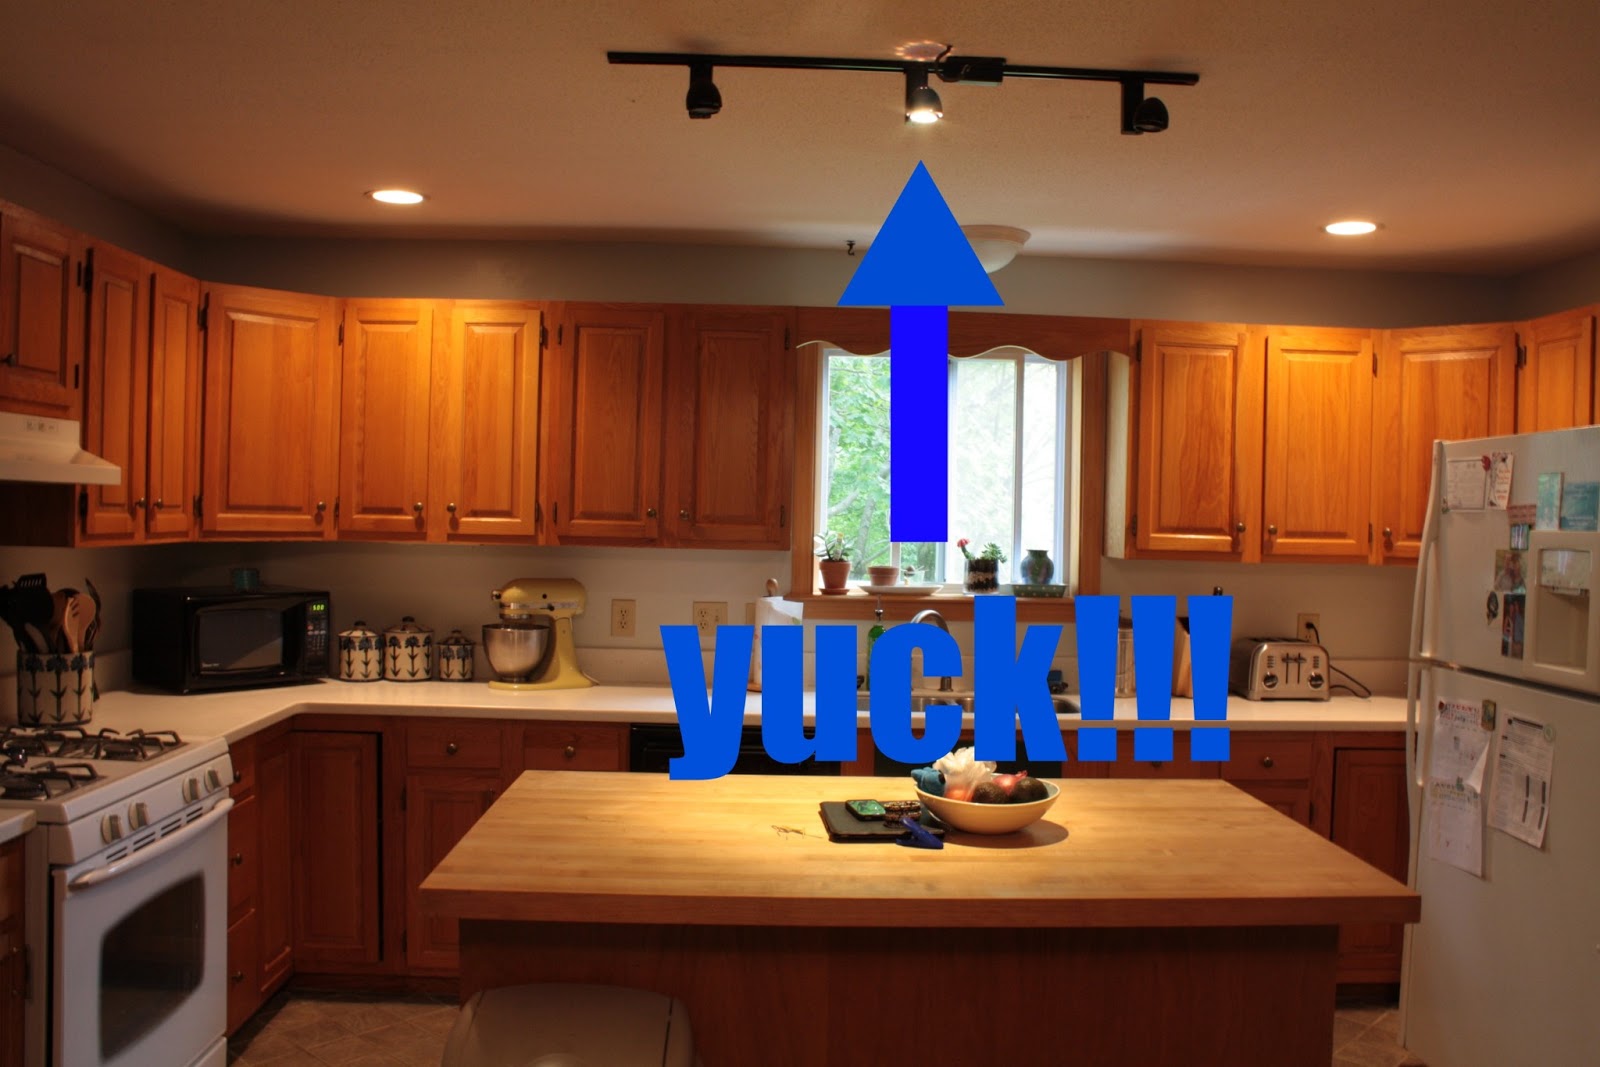
 The next thing is the track lighting above the island. Only one of the three lights works, and we don't like the light to begin with so we're not going to spend $5 on a bulb if we don't actually like it. I've been looking online for some vintage or vintagesque lights. I like the look of milk glass lights (surprised?)  and "schoolhouse lights", but am worried about buying them online without seeing something like it in real life. I'm on the hunt for something like this, or this.

Lastly, I think this swishy wave accent above the sink needs to go. I'm just worried it will leave a mark on the cabinets when I take it down. Perhaps I should not smash it with a sledge hammer to get it down, which is how I imagine doing it. 

I really like it and feel much happier in the kitchen now. Not happy enough to cook though! 

Lauren


Related Posts Plugin for WordPress, Blogger...